Are you switching between windows on your Mac all day long? There is a faster and smarter way to work on your Mac. Mac split screen lets you run two apps side by side easily. It is built right into macOS and takes seconds to set up. Split screen on Mac is something Mr Repair USA teaches Mac users every single day.
This guide covers every split-screen Mac method from beginner to advanced. You will learn macOS shortcuts, keyboard tricks, and the fastest ways to split screen on Mac. We at Mr Repair USA have helped thousands of Mac users work smarter every day. Our team teaches Mac tips and handles repairs for customers constantly. Let us get you working smarter, starting right now.
What Is Split Screen on Mac and Why Do You Need It?
Simple Explanation for Every Mac User
Split-screen on a Mac means running two apps side by side at the same time. Your screen gets divided into two halves for each open app you choose. You can see both apps simultaneously without switching between them constantly. This is called Mac split view, and it is built into every Mac model available. It works on MacBook Air, MacBook Pro, iMac, and Mac Mini models too.
Students, workers, and creatives all use this feature to save time every day. Multitasking on a MacBook becomes way easier once you know this trick well. Both apps share your full screen with zero distractions around them.
Split View vs Stage Manager vs Mission Control
These three features sound similar, lar but they work in very different ways on Mac. Mac split view puts exactly two apps side by side on one screen. Mission Control shows all your open windows and spaces at once for you. Stage Manager groups related windows together on the left side of your screen. Split view on Mac is the easiest and fastest option for most Mac users. Use Stage Manager on macOS Ventura and later for more complex layouts.
Method 1 — How to Split Screen on Mac Using the Green Button
The Easiest Method for Every Mac User
This is the simplest answer to how to do split screen on a Mac. Every Mac window has a small green circle button in the top left corner. This green button is your gateway to Mac split view instantly and easily.
Here are the steps to follow right now. Open the first app you want on the left side. Hover your mouse over the green circle button slowly and carefully. A small menu appears with tiling options right away on your screen. Click the Tile Window to the Left of the Screen option now. Your first app snaps to the left half of your screen immediately. Mission Control appears to show all your other open windows available. Click the second app you want on the right side of your screen. Both apps now fill your screen in Mac split view perfectly and completely.
How to Adjust the Split Screen Divider
Drag the black bar in the middle to resize both app windows anytime. Move it left to give more space to the right app on your screen. Move it to the right to give more space to the left app instead. This lets you customize your side-by-side apps’ Mac layout perfectly. Users who write and research at the same time love this resizing trick daily.
Method 2 — How to Split Screen on Mac Using Mission Control
A Great Method for Advanced Mac Users
Mission Control gives you way more control over Mac split window layouts. This method works great when the green button method feels too slow for you.
Follow these easy steps right now. Press the Mission Control key or swipe up with three fingers on your trackpad. Drag your first app window to the top of your screen carefully. Drop it there to create a new full-screen Space automatically for you. Drag your second app window onto that same Space now. Click the new Space at the top to enter Mac split view mode. Both apps now sit side by side in a perfect split screen Mac layout.
Switching Between Split View Spaces Easily
Swipe left or right with three fingers on your trackpad at any time. This moves between your different Spaces and split-screen Mac layouts fast. Press Control plus Left or Right Arrow to switch with the keyboard instead. Multitasking on a MacBook, users love this gesture for fast and smooth switching.
Method 3 — macOS Split Screen Shortcut Every Mac User Should Know
Keyboard Shortcuts to Split Screen Faster
Learning macOS split-screen shortcut keys saves you a lot of time every day. These keyboard tricks make splitting the screen on a Mac way faster.
The most useful Mac split-screen shortcut keys to remember are listed here. Control Command F makes any app go full screen instantly on your Mac. The Mission Control key F3 opens Mission Control on your Mac quickly. Control Up Arrow also opens Mission Control using only your keyboard. Control Left or Right Arrow switches between your Spaces fast and easily.
Trackpad Gestures for Split Screen on MacBook
Three-finger swipe up opens Mission Control on your MacBook trackpad instantly. Three-finger swipe left or right switches between your open Spaces smoothly. These gestures make multitasking on a MacBook feel super natural and fast. MacBook Pro and MacBook Air users use these gestures every single day.
Method 4 — How to Split Screen on MacBook Air With Keyboard
Step-by-Step for MacBook Air Users
How to split screen on a MacBook Air with a keyboard is really simple to learn. MacBook Air uses the same split-screen methods as MacBook Pro. The keyboard shortcut approach works perfectly on every MacBook Air split-screen model.
Here is the complete keyboard method to follow step by step. Press Control Command F to make your first app full screen immediately. Press the Mission Control key to open Mission Control on your Mac now. Drag your second app window up to the top bar area carefully. Drop it onto your first app Space at the top of the screen. Both apps now appear in the side-by-side apps Mac layout perfectly.
Method 5 — How to Split Screen on Mac With the Same App
Opening Two Windows of One App Side by Side
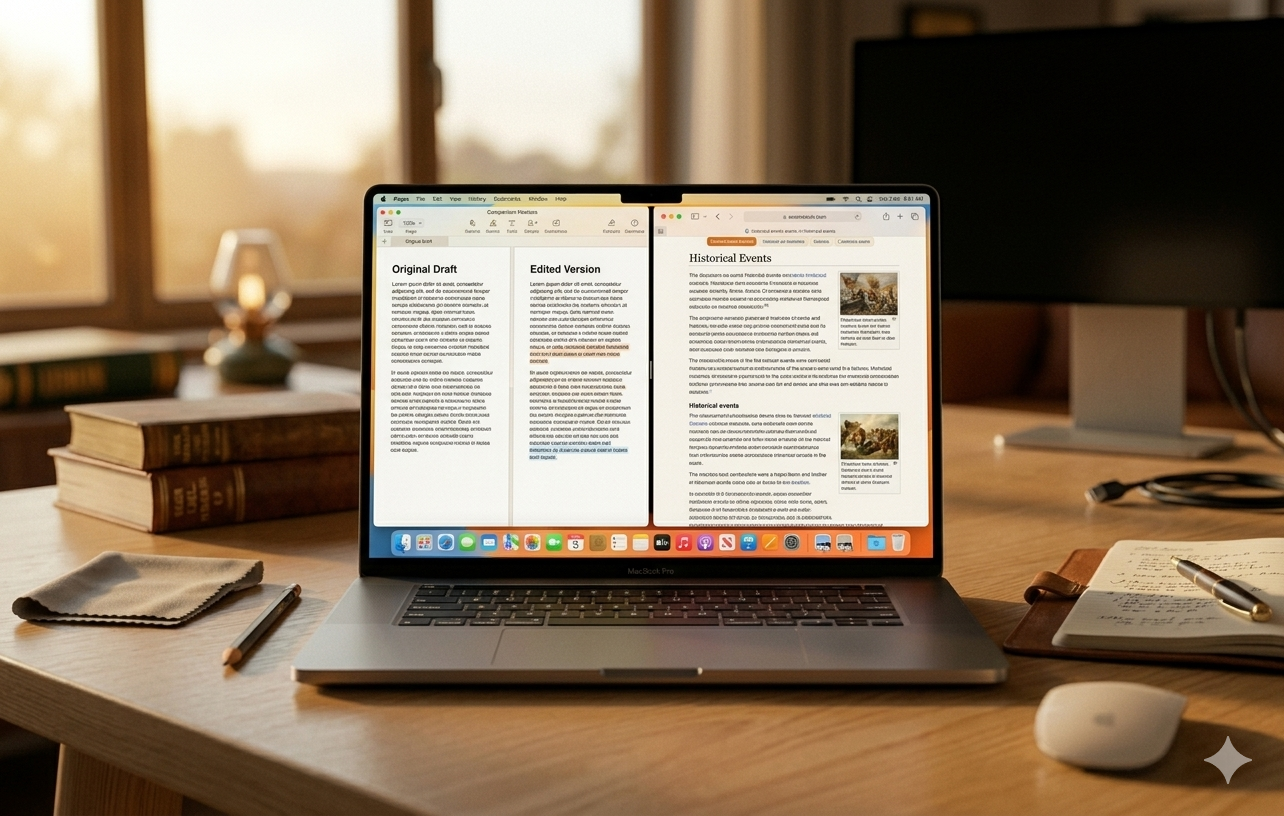
Many users ask how to split the screen on a Mac with the same app open. This works great for comparing two documents in Pages or Microsoft Word. You need two separate windows of the same app open first before starting.
Here is how to do it step by step right now. Open your app like Safari, Pages, or Notes on your Mac. Go to the File menu and click New Window to open a second one. Now you have two separate windows of the same app open and ready. Use the green button method on the first window now as described above. Select the second window of the same app on the right side. Both windows of the same app now sit side by side in split view on the Mac perfectly.
Tip: Not all apps support two windows, so always check the File menu first.
Method 6 — How to Split Screen on Mac With an External Monitor
Using Split View Across Two Screens
Split screen on a Mac with a monitor gives you even more workspace to use. Each display works independently, so you can have a split view on each screen. Your MacBook screen can have two apps, and your monitor can have two more.
Setting up split view with a monitor is really simple right now. Connect your external monitor to your MacBook Pro or Air using the right cable. Set your monitor as a separate display in System Settings under Displays. Make sure mirroring is turned off completely in your display settings. Now drag windows to each screen and use the green button split-screen Mac method. Each screen supports its own independent Mac split view layout perfectly. Users with home offices love this dual monitor setup every single working day.
Method 7 — How to Do a 4 Way Split Screen on Mac
Showing Four Apps at Once on Your Mac
A true 4-way split-screen Mac is not built into macOS natively right now. But you can get close using Mission Control and multiple Spaces together easily. Here is the best way to see four apps at once on your Mac.
Option 1 uses two monitors for a natural split-screen Mac setup. Use split view on your MacBook screen and your external monitor simultaneously. Each screen holds two apps, giving you four apps visible at the same time.
Option 2 uses third-party apps for advanced Mac split window control. Apps like Rectangle and Magnet allow for fast four-way window tiling easily. Rectangle is completely free and works brilliantly on every Mac model available. Download Rectangle and use keyboard shortcut to split screen Mac style to tile four apps. Power users love Rectangle for advanced Mac split-screen layouts and window management.
How to Split Screen on Mac in Chrome Browser
Using Chrome With Split View on Your Mac
How to split screen on Mac Chrome works exactly like any other app. Open Chrome and use the green button method described above already. Chrome also lets you open a second window using the Command N shortcut. Then tile both Chrome windows side by side using the split view Mac method. This is great for comparing two websites at the exact same time efficiently. Researchers and students use this Chrome split-screen Mac trick every single day.
Troubleshooting Split Screen Problems on Mac
Green Button Not Showing Tile Options
This is the most common how to split screen on Mac problem users face. Your macOS version might be too old to support split view natively on your device. Update your Mac to the latest macOS version through System Settings right now. Some apps do not support split-screen on Mac because they only allow one window. Check if the app has a New Window option in the File menu first.
Split View Disappeared After Mac Restart
Sometimes Mac split-view layouts disappear after restarting your Mac completely. This happens because apps do not always save their split positions automatically. Simply redo the split-screen Mac setup after restarting your Mac quickly. Use third-party apps like Rectangle to save and restore window positions automatically. Mac users with this problem should visit Mr Repair USA for fast help.
Mac Running Slow in Split View Mode
Side-by-side apps on Mac can slow down older Mac models sometimes during use. Close all background apps you are not using right now to free up memory. Reduce motion effects in System Settings, then Accessibility, then Display settings. If your Mac still runs slowly, it might need a RAM upgrade soon. Mr Repair USA upgrades and repairs slow Macs really fast and affordably, always.
Why Choose Mr Repair USA for Mac Help?
Mr Repair USA is the most trusted Mac repair and support team for customers. We fix slow Macs, broken screens, RAM upgrades, and software problems fast. Our technicians help with how to split screen on Mac setups and tips, too. We teach Mac tips and tricks to hundreds of users every single month. Thousands of happy customers trust Mr Repair USA every single day consistently. Visit mrrepairusa.com for fast, affordable Mac help today. We are way more affordable than Apple Store Genius Bar prices always.
Conclusion
Now you know exactly how to split screen on Mac using seven easy methods. Use the green button for the fastest and simplest Mac split view setup. Try Mission Control for more advanced Mac split window control always. Learn macOS split screen shortcut keys and trackpad gestures to work way faster. Use Rectangle for four-way splitting and advanced window management needs. If your Mac is slow or broken, visit mrrepairusa.com today. Mr Repair USA fixes every Mac problem quickly and affordably every time. Start using Mac split view today and never waste time switching windows again.
Frequently Asked Questions
How do I split my Mac screen into two?
To split screen on Mac, hover your pointer over the green button in any window. Pick Tile Window to the left of the screen or to the right of the screen to begin Mac split view instantly.
What is the Mac shortcut for split screen?
The easiest Mac split-screen shortcut is hovering over the green button and selecting a tile option. You can also use Control Command F to go full screen, then drag a second app into Mission Control.
How do I set up dual screens on my Mac?
Connect an external monitor and go to System Settings, then Displays. Turn off mirroring and drag windows to each screen. Each screen supports its own independent split-screen Mac layout.
How do I get a split-screen view?
How to do split screen on a Mac is simple using the green button method. Hover over the green circle button on any window, select Tile Window to Left or Right, and choose your second app to complete the Mac split view setup.
How do I exit split screen on Mac?
To exit, simply press the Escape (Esc) key on your keyboard or move your pointer to the top of the screen to reveal the window buttons and click the green circle again. This will return the window to its original size instantly.