How to take a screenshot on an iPhone is something every iPhone user should know now. You keep pressing the wrong buttons, and your iPhone locks or calls Siri instead. It feels really awful when something important fades away from your screen. The way you do it depends totally on which iPhone model you have.
New Face ID iPhones use very different buttons from older Home button models. This guide covers seven clear methods for every single iPhone model. You will also learn how to take a screenshot without any buttons. No additional apps are needed for any method covered in this guide. Stop by if your iPhone buttons need professional repair.
Let us solve your screenshot confusion starting, once and for all.
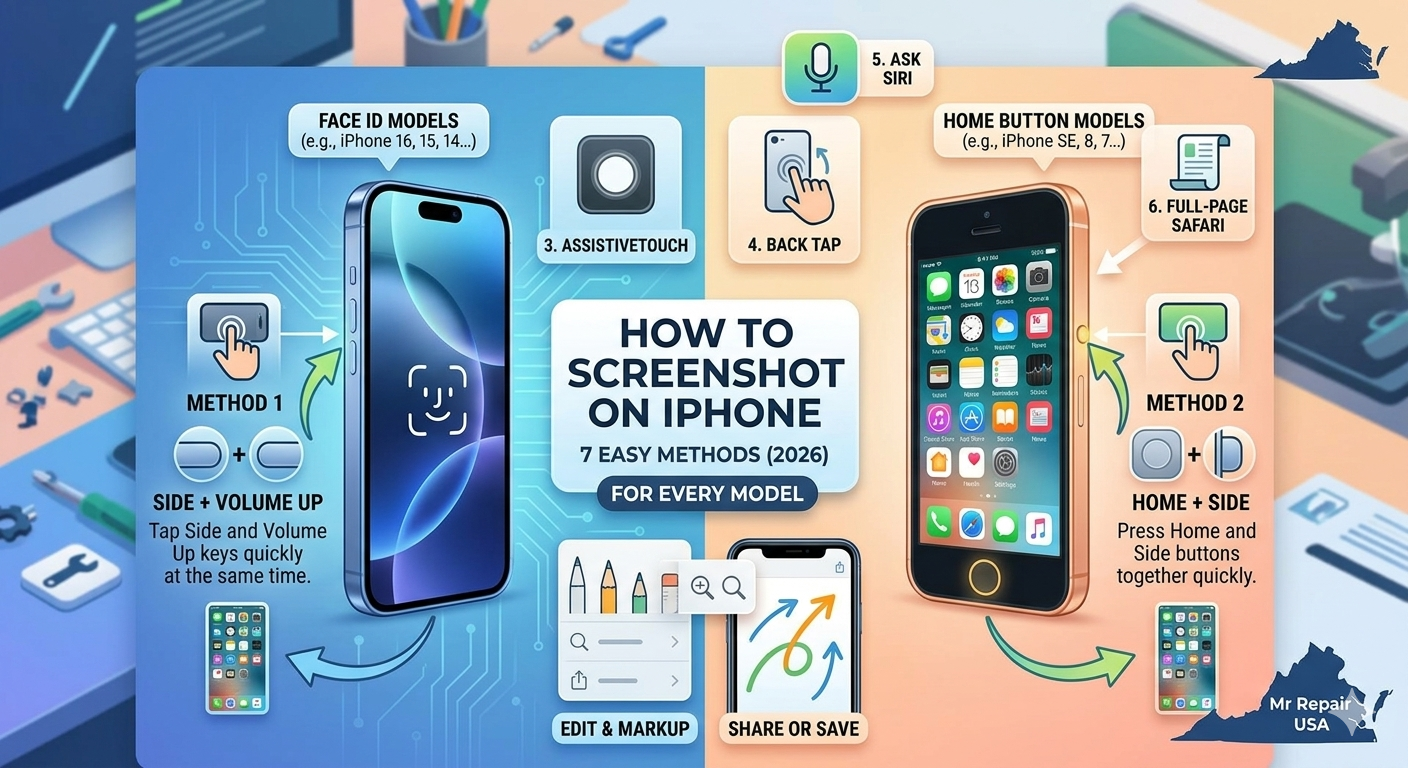
How to Screenshot on iPhone With Face ID Models?
Which iPhones Use This Method?
How to screenshot on an iPhone with Face ID covers the most popular models. This method works on iPhone X through the latest iPhone 16 Pro models. These iPhones have no Home button on the front. If your iPhone unlocks when you look at it, you have a Face ID model. Users with iPhone 11,1 12, 13, 14, 15, and 16 all use this method.
Step-by-Step for Face ID iPhones
Follow these exact steps to capture the iPhone display perfectly.
-
- Find the Side Button on the right side of your iPhone
-
- Find the Volume Up Button on the left side of your iPhone
-
- Press both buttons at the same time quickly
-
- Release both buttons immediately do not hold them down
-
- A white flash confirms your saved iPhone screen was successful
-
- A small thumbnail preview appears in the bottom left corner
-
- Tap the thumbnail to edit or ignore it to save automatically
Tips to Avoid Accidental Screenshots
Press both buttons quickly rather than holding them down. Holding the Side Button instead activates Siri or the power-off slider. Holding Volume Up while pressing the Side Button triggers Emergency SOS mode. Practice the quick simultaneous press a few times to get the timing right. Users who struggle with timing find that pressing Volume Up first helps.
How to Take a Screenshot on an iPhone With a Home Button?
Which iPhones Use the Home Button Method?
The screenshot button iPhone combo is different on older Home button models. This method works on iPhone 8, iPhone 7, iPhone 6, and iPhone SE models. The iPhone SE second generation (2020) and third generation (2022) also use this. If your iPhone has a round physical button at the bottom, it uses this method. Users with older iPhones should always use these exact steps below.
Step-by-Step for Home Button iPhones
Here is exactly how to screenshot on iPhone with a Home button:
-
- Find the Home Button at the bottom center of your iPhone
-
- Find the Side Button on the right side of your device
-
- Press both buttons at the same time, quickly now
-
- Release both buttons immediately after pressing them together
-
- You will hear a camera click sound confirming success right away
-
- A white flash appears on your screen for a brief moment
-
- The thumbnail preview always appears in the bottom left corner
Very Old iPhones With Top Button Instead
iPhone SE first generation and iPhone 5 and older use a different button. These very old models have a Top Button instead of a Side Button. Press the Home Button and Top Button at the same time to take a screenshot. The process and result are identical to the Side Button method always. Users with these older models follow the same quick press rule.
How to Screenshot on an iPhone Without Any Buttons?
Method 3 — AssistiveTouch On-Screen Button
Taking a screenshot on an iPhone without a button is very easy with AssistiveTouch. This is the best iPhone screenshot shortcut when your physical buttons stop working. Virginia customers at Mr. Repair USA use this trick all the time.
Here is how to set up and use AssistiveTouch Open Settings on your iPhone immediately
-
- Tap Accessibility, and then tap Touch
-
- Tap AssistiveTouch and toggle it on now
-
- A floating white circle button appears on your screen
-
- Tap that circle, then tap Device
-
- Tap Mor,e then tap Screenshot to capture instantly
-
- Your saved iPhone screen saves to Photos automatically
Method 4 — Back Tap for Fastest Screenshots Ever
Back Tap is honestly the fastest and coolest iPhone screen capture tip available. Just double-tap the back glass of your iPhone to capture instantly. Avoid all buttons,d menus and floating icons for this easy step. This works on iPhone 8 and newer models running iOS 14 or later.
Setting up Back Tap takes less than one minute:
-
- Go to Settings then tap Accessibility
-
- Tap Touch then tap Back Tap at the bottom
-
- Tap Double Tap and select Screenshot from the list
-
- That is it double-tap your iPhone back anytime to screenshot
Users with broken buttons absolutely love this method always.
Method 5 — Ask Siri to Take a Screenshot
Siri can take screenshots completely hands-free for you. Say Hey Siri, take a screenshot out loud to your iPhone immediately. Siri captures your screen instantly and saves it to your Photos app. This works great when your hands are busy or buttons feel unresponsive. Note that some apps with privacy restrictions may block Siri screenshots. Users cooking, exercising, or driving love this completely hands-free method.
How to Take a Full-Page Screenshot on iPhone?
Capture an Entire Webpage in Safari
How to take a full screenshot on an iPhone beyond your screen is really easy. Full page capture saves the entire webpage as one long scrolling PDF file. This only works inside the Safari browser app on your iPhone.
Follow these steps for a full page capture of the iPhone display:
-
- Open Safari and go to the webpage you want to capture
-
- Take a normal screenshot using any method described above
-
- Tap the thumbnail preview in the bottom left corner quickly
-
- Tap the Full Page tab at the very top of the edit screen
-
- The entire webpage appears as one long scrollable image now
-
- Tap Done, then select Save PDF to Files to keep it
-
- Find your saved PDF in the Files app under iCloud Drive
Limitations and Workarounds to Know
Full page capture only works in Safari and a few select other apps. Most apps, including Instagram,m TikTok, and Gmail, do not support full pages. For apps without a full page, take multiple regular screenshots in sequence. Use the free app Tailor to automatically stitch multiple screenshots together. Users who save online receipts and articles love the full page feature.
How to Edit and Annotate Screenshots on iPhone?
Using the Markup Editor After Capturing
After any screenshot, the Markup editor lets you customize your image fast. Tap the thumbnail preview before it disappears from the bottom left corner. The Markup editor opens with a full set of annotation tools available.
Here is what you can do in Markup:
-
- Crop the screenshot to remove unwanted edges or areas
-
- Draw arrow lines and circles to highlight important things
-
- Add text boxes to label or explain parts of your screenshot
-
- Highlight text or areas using the yellow highlighter tool
-
- Blur or cover sensitive personal information before sharing
-
- Add magnifier circles to zoom into small details clearly
Saving and Sharing After Editing
Tap Done after editing and choose where to save your screenshot now. Select Save to Photos to keep it in your Photos app library. Select Save to Files to store it in your iPhone Files app instead. Use the Share button to send directly via Messages Mail, or AirDrop. Users share edited screenshots to Notes and Google Drive daily.
Where Are Screenshots Saved on Your iPhone?
Finding Your Screenshots in Photos App
Every saved iPhone screen capture goes to the same place on the iPhone.Open your Photos app and tap the Albums tab sitting at the bottom. Scroll down until you find the Screenshots album written in that list. All your screenshots are placed in time order inside this same album. They also appear in your main Recents photo library alongside all photos. Users with thousands of screenshots should use this album to find them.
Organizing and Cleaning Up Old Screenshots
Fixing and Wiping Out Old Screenshots. Screenshots add up quickly and use a big amount of iPhone storage. Choose many old screenshots in the album by hitting Select at the top. Pick all the screenshots you want to toss then hit the trash icon. Wipe the Recently Deleted album to really save your storage space. Build a nice album for important screenshots you want to save forever. Virginia Mr Repair USA folks save much room by wiping screenshots monthly.
Troubleshooting When Screenshots Are Not Working?
Buttons Not Responding on Your iPhone.
Sometimes, how to screenshot on an iPhone stops working because of button problems. Try restarting your iPhone first if buttons feel unresponsive. Update your iPhone to the latest iOS in Settings, then General, then Software Update. Use AssistiveTouch or Back Tap as your immediate workaround solution always. If your Side Button or Volume Button is physically broken, visit us. Mr. Repair USA in Virginia fixes broken iPhone buttons quickly and affordably. Do not struggle with broken buttons when a fast repair is available now.
Screenshot Not Saving to Photos App
If your screenshot goes but leaves without saving, you ought to check things. See to it that the iPhone storage is not full on your phone. Go to Settings, then General, then iPhone Storage to look for your space. Check if the Photos app might save new images for you here. Go to Settings, then Privacy, then Photos and make sure it is good. Update iOS because some older versions have screenshot saving bugs known. Users with full iPhones constantly lose screenshots and can free up space fast.
Some Apps Block Screenshots Completely
Banking apps, Netflix, and some secure apps block capture of iPhone displays entirely. These apps use DRM digital rights management to prevent screen capture. When you try to screenshot a blocked app, your image saves as completely black. Use the app’s built-in share or export feature as your alternative always. Screen recording is also blocked by most DRM-protected apps on iPhone. This is normal behavior and not a sign your iPhone is broken at all.
Why Do iPhone Users Trust Mr. Repair USA?
Mr. Repair USA is Virginia’s most trusted iPhone repair and support team. We fix broken Side Buttons, Home Button,s Volume Buttons,s and screens fast. Our Virginia technicians teach how to screenshot on iPhone and more daily. We diagnose every iPhone problem quickly and give honest, affordable repair quotes. Thousands of happy Virginia customers trust Mr.Repair USA every single day. We are way more affordable than Apple Store Genius Bar repair prices always. Visitmrrepairusa.com and book your iPhone repair appointment.
Conclusion
How to screenshot on an iPhone is now completely clear for every single model. Face ID users press the Side Button and Volume Up together really quickly. Home button users press the Home Button and Side Button at the same time. Use Back Tap or AssistiveTouch when buttons are broken or unavailable. Ask Siri for a completely hands-free screenshot capture anytime you want. Use Safari Full Page to capture entire webpages as PDF files easily. If your iPhone buttons are physically broken, just visit us. Mr. Repair USA in Virginia fixes every iPhone problem fast and affordably. Start taking perfect screenshots on your iPhone always.
Frequently Asked Questions
How do you take a screenshot on a phone?
Take Face ID iPhone screenshots by pressing the side button alongside the volume up button now. Home button iPhones press the side or top button with the home button firmly. Thumbnail shows in the corner for quick edits or shares images saved to Photos.
How to take a full screenshot on an iPhone?
This feature shines brightest in Apple apps Safari, Mail, and Notes.
For the Home button, older iPhones press the Side or Top with Home.
How do you screenshot on an iPhone without using buttons?
iPhone screenshot button-free? Back Tap, AssistiveTouch, or Siri works perfectly.
Where is the screenshot button on an iPhone?
On iPhones with Face ID, press the right Side button and the left Volume Up button together. iPhone has a Home button press Side or Top with the Home button now. Release buttons right away to grab the screen; thumbnails bottom-left.
How do I take a screenshot quickly?
Windows Key plus PrtSc gives the quickest full-screen screenshot, auto-saved to Pictures. Then the Screenshots folder holds your capture automatically. Press Windows Key Shift S for the selective area using the Snipping Tool. Drag the rectangle, copying the image straight to the clipboard.